
I remember the first time I took my kayak out on big water. I felt completely blind. I knew the fish were down there, but I had no idea where. That all changed the day I finally installed electronics on my rig. If you are wondering how to install fish finder on Hobie kayak, you have come to the right place. I have done this install on multiple boats. It is much easier than you might think. You do not need to be a mechanic to get it right. Let’s get your kayak ready to find the big ones.
Why Install a Fish Finder on Your Hobie Kayak?
You might ask, is it really worth the effort? The answer is a huge yes. Adding a fish finder changes the game entirely. It turns luck into skill.
When you pedal a Hobie, your hands are free. This is a huge advantage. A fish finder lets you use that advantage to the fullest. You can pedal while watching the screen. You can spot a drop-off or a school of bait and cast immediately.
For me, it is about efficiency. I used to spend hours casting at empty water. Now, I look for structure. I look for temperature breaks. Whether you fish deep lakes or shallow flats, seeing what is under your hull saves you time. And saving time means more time catching.

Choosing the Right Fish Finder
Picking the right unit can feel overwhelming. There are so many choices. But for a kayak, you want to keep it simple and tough.
First, look at the screen. You don’t need a massive TV screen on your kayak. A 5-inch or 7-inch screen is usually perfect. It is big enough to see but small enough to stay out of your way.
Next, think about the transducer. This is the “eye” of the system.
- CHIRP Sonar: This gives you a clear picture of fish arches.
- Down Imaging: This looks like a photo of what is right below you.
- Side Imaging: This shows you what is to the left and right. It is great for finding cover in shallow water.
My Top Picks for Hobie:
- Lowrance Hook Reveal: Hobie kayaks are “Lowrance Ready.” This makes installation a breeze.
- Garmin Striker Vivid: Bright colors and easy GPS. Great for the price.
- Humminbird HELIX: Amazing clarity, especially if you want side imaging.
Tools and Materials Needed
You do not want to start this project and realize you are missing a tool. Trust me, I have been there. It is frustrating. Gather these things before you start.
The Tools:
- A cordless drill and standard bits.
- Phillips head screwdriver.
- Wire strippers and a crimping tool.
- Heat gun (or a lighter in a pinch) for shrink wrap.
The Materials:
- Your Fish Finder: The screen and the transducer.
- Mounting Kit: Most Hobies use a specialized plate (Guardian or Lowrance Ready).
- Battery: A 12V lithium battery (LiFePO4) is best. It is light and lasts all day.
- Waterproof Battery Box: To keep your power source dry.
- Marine Goop or Sealant: Vital for sealing any holes.
- Zip Ties: To keep wires tidy.
- Dielectric Grease: To protect connections from corrosion.
Step-by-Step Installation Guide
Ready to get to work? Take your time. Read through these steps once before you pick up a screwdriver.

Step 1: Preparing the Kayak
First, put your kayak on a stand or some sawhorses. You need access to the bottom of the hull. Wash the kayak. You want a clean surface to work with.
Locate the transducer cavity. On most modern Hobies, like the Pro Angler or Outback, this is underneath the hull. It is usually covered by a plastic plate. This is the “Guardian” or “Lowrance Ready” plate.
Step 2: Installing the Transducer
This is often the part people fear most. But on a Hobie, it is designed to be easy.
- Remove the Plate: Unscrew the protective plate from the bottom of the kayak.
- Mount the Transducer: Attach your transducer to the inside of that plate. If you have a Lowrance, it bolts right on. If you have a Garmin or Humminbird, you might need an adapter bracket.
- Route the Cable: Feed the transducer cable up through the scupper hole. This hole leads into the cockpit.
- Reattach the Plate: Screw the plate back onto the hull. Ensure the transducer sits flush. You do not want it dragging on the sand when you launch.
Note: If your kayak does not have a plate, you may need to use the “in-hull” method. This involves glueing the transducer to the inside of the hull with slow-cure marine epoxy. But for most Hobie owners, the plate method is superior.
Step 3: Installing the Battery and Wiring
Now we need power. You need a safe, dry spot for your battery.
- Choose a Spot: The front hatch or the rear cargo area are common spots. I prefer the front hatch or the dedicated battery pocket if your model has one.
- Run the Power Cable: Hobie has pre-drilled “thru-hull” plugs. Do not drill new holes if you don’t have to. Remove the factory plug. Insert the rubber grommet that fits your wire size. Push the power wire through.
- Connect the Battery: Connect your fish finder’s power cable to the battery. Red goes to positive (+). Black goes to negative (-).
- Install a Fuse: This is critical. Put a fuse holder on the red (positive) wire. If a surge happens, you blow a 50-cent fuse, not a $500 unit.
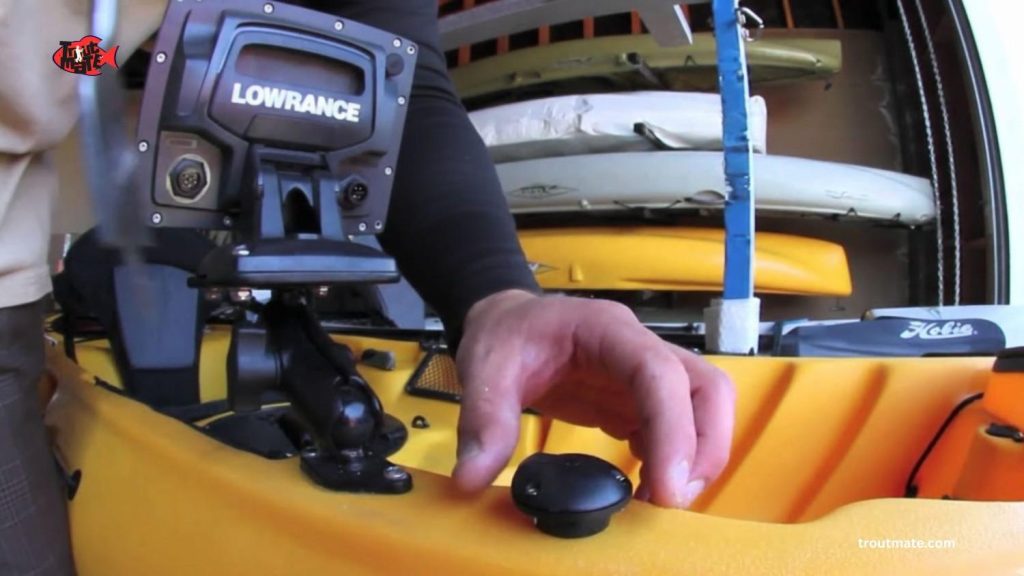
Step 4: Mounting the Fish Finder Display
You need to see the screen easily while pedalling.
- Use the H-Rail: If your Hobie has H-Rails, buy an H-Rail mounting ball. It clamps right on. No drilling required.
- Gear Track: If you don’t have rails, use the gear tracks on the side. A “T-bolt” base works perfectly here.
- Secure the Unit: Snap the display unit onto the mount.
- Plug it In: Connect the power cable and the transducer cable to the back of the unit. Apply a little dielectric grease to the pins to stop rust.
Step 5: Testing the System
Do not wait until you are on the water to test it.
- Power Up: Turn the unit on.
- Check the Screen: Does it light up? Good.
- Listen: Put your ear near the transducer. You should hear a faint clicking sound. That means it is pinging.
- Tidy Up: Use zip ties to bundle extra wire inside the hull. Loose wires snag on gear. Keep it clean.
Tips for Optimal Performance
Installing it is just step one. Using it is step two.
- Adjust Sensitivity: In clear water, turn sensitivity down. In dirty water, turn it up.
- Turn off Fish ID: Most units have a “Fish ID” mode that shows little cartoon fish. Turn this off. You want to see the raw arches. It is more accurate.
- Maintenance: Saltwater is the enemy. Rinse your connections after every single trip. Spray them with a corrosion inhibitor now and then.
Troubleshooting Common Issues
Even the best setups have hiccups. Here is how to fix them.
- Unit Won’t Turn On: Check the battery charge first. Then check the fuse. A blown fuse is the most common cause.
- Screen is Black: Check your brightness settings. Sometimes we accidentally dim them to zero.
- Noise on the Screen: If the screen is full of clutter, check your transducer. Is it loose? Is it covered in bubbles? If you glued it in-hull, air bubbles in the epoxy will ruin the signal.
- No Depth Reading: Make sure the transducer is fully submerged. It won’t work through air.
FAQs
Can I install a fish finder without drilling holes?
Yes! Most modern Hobie kayaks come with “Lowrance Ready” or Guardian plates and pre-drilled cable ports. You usually do not need to drill into the hull itself.
What is the best battery for a kayak fish finder?
I highly recommend a 12V LiFePO4 (Lithium Iron Phosphate) battery. A 10Ah (amp-hour) battery is small, weighs less than 3 pounds, and will run most units for a full day or more.
Do I need a specific brand of fish finder for a Hobie?
No, you can use any brand. However, Lowrance units often fit the Hobie mounting plates right out of the box. Garmin and Humminbird work great too, but you might just need a simple plastic adapter bracket.
Final Verdict
Adding a fish finder to your Hobie is one of the best upgrades you can make. It opens up a new world beneath your boat. You stop guessing and start hunting. The process of learning how to install a fish finder on a Hobie kayak is straightforward. Hobie has done a great job making their boats ready for this tech. You just need a few tools and a free afternoon.
So, grab your drill, order your parts, and get it done. The fish are waiting. Once you see the underwater world on that screen, you will wonder how you ever fished without it.

I’m the owner of TroutMate and a passionate fishing enthusiast. I share hands-on guides, gear reviews, and practical tips for freshwater, saltwater, and kayak fishing. My mission is to help anglers of all levels catch more fish, explore new locations, and enjoy every trip on the water.
